Using oneAPI Construction Kit and TornadoVM to accelerate Java Programs on x86, ARM and RISC-V CPUs
Published:
Key Takeaways
- oneAPI Construction Kit (OCK) is a new framework that allows software developers and system designers to bridge the gap between hardware accelerators and open standards, by enabling a programming system to implement domain specific instructions for modern hardware such as RISC-V accelerators and custom processors.
- OCK runs standard OpenCL 3.0 and SPIR-V 1.0. Thus, it can be also used as a standalone acceleration platform that can run on different devices, including ARM and x86-64 CPUs.
- TornadoVM can use OCK as an OpenCL and SPIR-V driver to deploy the generated OpenCL and SPIR-V code on modern hardware accelerators, including CPUs, allowing Java developers to access a wide range of hardware with minimal programming effort.
- This post shows how to setup OCK to be used with TornadoVM for Intel, ARM and RISC-V CPUs. Besides, it shows a performance evaluation of TornadoVM/OCK compared to Java Parallel Streams running on the same CPU.
Introduction

The oneAPI Construction Kit (OCK) is an open-source programming framework that allows developers to implement operations for new hardware (e.g., RISC-V accelerators, or any other type of accelerators, such as hardware for AI).
What makes OCK special is that this framework can facilitate developers to map open programming standards, such as SYCL and OpenCL, to new hardware accelerators. With a few configuration files, developers can define the set of operations for the new hardware, and then map those operations to the implementation of open standards like SYCL.
Furthermore, OCK could also be used as a runtime dispatcher of OpenCL and SPIR-V kernels, and this is the interest of this post. We could configure OCK to provide an OpenCL dispatcher to run on Intel CPUs, ARM CPUs and even RISC-V cores.
This post explains how to configure and install OCK to work as a backend for TornadoVM, allowing Java developers to access CPUs from different vendors as OpenCL devices.
The following instructions about how to build and deploy TornadoVM with OCK are focused on Linux systems. However, it should be possible to build OCK for other platforms, such as Windows.
The rest of the post is organised as follows: Firstly, we will explain how to get OCK and TornadoVM started on Intel CPUs, ARM CPUs, and RISC-V CPU Cores with Vector instructions. Secondly, we will show a performance evaluation for Intel and ARM CPUs and compare TornadoVM + OCK with the execution of Java parallel streams and Intel oneAPI running on the same CPU. Do you think that TornadoVM and OCK will run faster than Java? Let’s find out!
Installing prerequisites
If you use Fedora or Red Hat-based distributions, you will need to install the following dependencies.
$ sudo dnf install ninja doxygen python3-pip git cmake spirv-tools
$ sudo pip3 install lit cmakelint
Installation Guidelines for x86/64 & Performance Evaluation
We are now going to configure and install OCK to be used by TornadoVM as an OpenCL and SPIR-V kernel dispatcher for X86/64 CPUs. Thus, TornadoVM will see a new OpenCL device for our system, and that device can be used to dispatch and accelerate our Java parallel kernels.
Configure LLVM
mkdir ock
cd ock
baseDIR=$PWD

## Clone LLVM
git clone https://github.com/llvm/llvm-project.git llvm
cd llvm
llvmDIR=$PWD
At the time of writing this post, the supported LLVM version for OCK is 18. Thus, we need to configure LLVM using the 18.x branch:
git checkout release/18.x
Configure LLVM:
export LLVMINSTALL=$llvmDIR/build-x86_64/install

cmake llvm -GNinja \
 -Bbuild-x86_64 \
 -DCMAKE_BUILD_TYPE=Release \
 -DCMAKE_INSTALL_PREFIX=$LLVMINSTALL \
 -DLLVM_ENABLE_PROJECTS="clang;lld" \
 -DLLVM_TARGETS_TO_BUILD=X86
Then, built and install:
ninja -C build-x86_64 install
Configure and Install OCK
Configure OCK using the LLVM we have just installed:
cd $baseDIR
git clone https://github.com/codeplaysoftware/oneapi-construction-kit
cd oneapi-construction-kit

cmake . -GNinja \
 -Bbuild-x86_64 \
 -DCMAKE_BUILD_TYPE=Release \
 -DCMAKE_INSTALL_PREFIX=$PWD/build-x86_64/install \
 -DCA_ENABLE_API=cl \
 -DCA_ENABLE_DOCUMENTATION=OFF \
 -DCA_LLVM_INSTALL_DIR=$LLVMINSTALL
Build OCK:
ninja -C build-x86_64 install
Next, we need to configure the Linux system to use the new OpenCL installation. There are various ways to get this. One of them is updating the folder /etc/OpenCL/vendors/ with a new file that contains the path to the libCL.so installation.
sudo vim /etc/OpenCL/vendors/ock.icd
And we add the following line:
## content of the file <your-path-to-libCL.so>
/home/juan/repos/ock/oneapi-construction-kit/build-x86_64/install/lib/libCL.so
Configure TornadoVM
We are now ready to install TornadoVM. Note that, if you have TornadoVM already installed, there is no need to reconfigure it. TornadoVM will detect the new device automatically.
cd TORNADOVM_ROOT
./bin/tornadovm-installer --jdk jdk21 --backend=opencl,spirv
source setvars.sh
Let’s explore all devices available:
tornado --devices

Number of Tornado drivers: 2
Driver: SPIR-V
  Total number of SPIR-V devices  : 2
  Tornado device=0:0  (DEFAULT)
SPIRV -- SPIRV OCL - Intel(R) HD Graphics 630
Global Memory Size: 28.9 GB
Local Memory Size: 64.0 KB
Workgroup Dimensions: 3
Total Number of Block Threads: [256]
Max WorkGroup Configuration: [256, 256, 256]
Device OpenCL C version: OpenCL C 1.2

  Tornado device=0:1
SPIRV -- SPIRV LevelZero - Intel(R) HD Graphics 630
Global Memory Size: 28.9 GB
Local Memory Size: 64.0 KB
Workgroup Dimensions: 3
Total Number of Block Threads: [256]
Max WorkGroup Configuration: [256, 256, 256]
Device OpenCL C version:  (LEVEL ZERO) 1.3

Driver: OpenCL
  Total number of OpenCL devices  : 4
  Tornado device=1:0
OPENCL --  [NVIDIA CUDA] -- NVIDIA GeForce GTX 1050
Global Memory Size: 3.9 GB
Local Memory Size: 48.0 KB
Workgroup Dimensions: 3
Total Number of Block Threads: [1024]
Max WorkGroup Configuration: [1024, 1024, 64]
Device OpenCL C version: OpenCL C 1.2

  Tornado device=1:1
OPENCL --  [Intel(R) OpenCL Graphics] -- Intel(R) HD Graphics 630
Global Memory Size: 28.9 GB
Local Memory Size: 64.0 KB
Workgroup Dimensions: 3
Total Number of Block Threads: [256]
Max WorkGroup Configuration: [256, 256, 256]
Device OpenCL C version: OpenCL C 1.2

  Tornado device=1:2
OPENCL --  [ComputeAorta] -- ComputeAorta x86_64   ## <<<<<<< NEW DEVICE
Global Memory Size: 7.8 GB
Local Memory Size: 32.0 KB
Workgroup Dimensions: 3
Total Number of Block Threads: [1024]
Max WorkGroup Configuration: [1024, 1024, 1024]
Device OpenCL C version: OpenCL C 1.2 Clang 18.1.8
We see a new device using the IDs 1:2 (backend 1, device 2). Note that, depending on your configuration, you might see a different ordering of devices. The ComputeAorta Device is now configured to use the Intel CPU using the OCK.
If we want to run in this device, we simply add the following options to our tornado launcher:
--jvm="-DtaskGraphName.taskName.device=1:2"
The taskGraphName and the taskName` are application specific. For instance, using one of example within the TornadoVM suite:
tornado --printKernel --jvm="-Ds0.t0.device=1:2" --threadInfo \
-m tornado.examples/uk.ac.manchester.tornado.examples.arrays.ArrayAddInt

#pragma OPENCL EXTENSION cl_khr_fp64 : enable
#pragma OPENCL EXTENSION cl_khr_fp16 : enable
#pragma OPENCL EXTENSION cl_khr_int64_base_atomics : enable
__kernel void add(__global long *_kernel_context, __constant uchar *_constant_region, __local uchar *_local_region, __global int *_atomics, __global uchar *a, __global uchar *b, __global uchar *c)
{
  long l_7, l_8;
  ulong ul_13, ul_11, ul_9, ul_1, ul_2, ul_0;
  int i_10, i_12, i_5, i_6, i_3, i_4, i_14, i_15;

  // BLOCK 0
  ul_0  =  (ulong) a;
  ul_1  =  (ulong) b;
  ul_2  =  (ulong) c;
  i_3  =  get_global_size(0);
  i_4  =  get_global_id(0);
  // BLOCK 1 MERGES [0 2 ]
  i_5  =  i_4;
  for(;i_5 < 8;)
  {
    // BLOCK 2
    i_6  =  i_5 + 6;
    l_7  =  (long) i_6;
    l_8  =  l_7 << 2;
    ul_9  =  ul_0 + l_8;
    i_10  =  *((__global int *) ul_9);
    ul_11  =  ul_1 + l_8;
    i_12  =  *((__global int *) ul_11);
    ul_13  =  ul_2 + l_8;
    i_14  =  i_10 + i_12;
    *((__global int *) ul_13)  =  i_14;
    i_15  =  i_3 + i_5;
    i_5  =  i_15;
  }  // B2
  // BLOCK 3
  return;
}  //  kernel

Task info: s0.t0
Backend           : OPENCL
Device            : ComputeAorta x86_64 L_DEVICE_TYPE_CPU (available)
Dims              : 1
Global work offset: [0]
Global work size  : [8]
Local  work size  : [8, 1, 1]
Number of workgroups  : [1]
But we also configured the SPIR-V backend with TornadoVM. So why don’t we see a SPIR-V device called ComputeAorta? This is because the ComputeAorta device supports SPIR-V 1.0, while TornadoVM supports, at minimum, SPIR-V 1.2.
We can override this setting and force it to use SPIR-V 1.0 (or any other version). Note that TornadoVM does not guarantee that it runs all supported features with previous SPIR-V versions. If we want to enable a previous version of SPIR-V, we simply add the following flag:
--jvm="-Dtornado.spirv.version=1.0"
For instance:
tornado --jvm="-Dtornado.spirv.version=1.0"  --devices

Number of Tornado drivers: 2
Driver: SPIR-V
  Total number of SPIR-V devices  : 2
  Tornado device=0:0  (DEFAULT)
SPIRV -- SPIRV OCL - Intel(R) HD Graphics 630
Global Memory Size: 28.9 GB
Local Memory Size: 64.0 KB
Workgroup Dimensions: 3
Total Number of Block Threads: [256]
Max WorkGroup Configuration: [256, 256, 256]
Device OpenCL C version: OpenCL C 1.2

  Tornado device=0:1
SPIRV -- SPIRV OCL - ComputeAorta x86_64     <<<< ComputeAorta
Global Memory Size: 7.8 GB
Local Memory Size: 32.0 KB
Workgroup Dimensions: 3
Total Number of Block Threads: [1024]
Max WorkGroup Configuration: [1024, 1024, 1024]
Device OpenCL C version: OpenCL C 1.2 Clang 18.1.8
Now we can run on this device with SPIR-V too:
tornado --printKernel --jvm="-Dtornado.spirv.version=1.0 -Ds0.t0.device=0:1" --threadInfo -m tornado.examples/uk.ac.manchester.tornado.examples.arrays.ArrayAddInt

; MagicNumber: 0x7230203
; Version: 1.2
; Generator ID: 32
; Bound: 81
; Schema: 0
# ...
##  SPIRV CODE
# ...
Task info: s0.t0
Backend           : SPIRV
Device            : SPIRV OCL - ComputeAorta x86_64 CPU
Dims              : 1
Global work offset: [0]
Global work size  : [8]
Local  work size  : [8, 1, 1]
Number of workgroups  : [1]
It is also possible to dump the Assembly code that the OCK compiler generates from the OpenCL C code. To do so, we need to configure OCK with debug information:
-DCA_ENABLE_DEBUG_SUPPORT=ON
Then, to dump the assembly code, we export the following variable:
export CA_HOST_DUMP_ASM=1
And run TornadoVM commands as usual:
tornado --jvm="-Ds0.t0.device=1:3" -m tornado.examples/uk.ac.manchester.tornado.examples.compute.MatrixMultiplication2D 256

        ... //
        vpaddq  %ymm0, %ymm10, %ymm10
        vpaddq  %ymm0, %ymm9, %ymm9
        vpbroadcastq    (%rsi), %ymm6
        vpcmpgtq        %ymm9, %ymm6, %ymm11
        vpcmpgtq        %ymm10, %ymm6, %ymm6
        vpackssdw       %ymm6, %ymm11, %ymm6
        vextracti128    $1, %ymm6, %xmm11
        vpackssdw       %xmm11, %xmm6, %xmm6
        vpshufd $216, %xmm6, %xmm6
        vpand   %xmm6, %xmm8, %xmm8
        vpsllw  $15, %xmm8, %xmm6
        vpmovmskb       %xmm6, %edx
We see that Intel vector AVX instructions are being generated!
Performance on Intel x86/64 CPUs
Let’s run some experiments to evaluate the performance of OCK with TornadoVM on a modern Intel CPU. For this experiment, we are going to run the MatrixMultiplication2D example from the TornadoVM example suite as follows:
tornado --jvm="-Ds0.t0.device=0:1" -m tornado.examples/uk.ac.manchester.tornado.examples.compute.MatrixMultiplication2D 256
We run this application with four different data sizes (256, 512, 1024 and 2048). The system used is a Linux machine with an Ubuntu 22.04.4 LTS OS and 6.5.0-35-generic Linux Kernel. The Intel driver for OpenCL CPU is 2024.18.6.0.02_160000. The system contains an Intel i9-13900K CPU with 64GB of RAM.
We use OCK 4.0.0, commit 5be5a8d, and Intel oneAPI 2024.2 for CPUs and OpenCL. The TornadoVM version used is 1.0.8-dev, commit ea85f22. The Java OpenJDK used is build 21.0.4+8-LTS-274.
Experimental Methodology
We run the matrix multiplication benchmarks for 4 different versions, namely, Java Single-Threaded, Java with Parallel Streams, TornadoVM using OCK, and TornadoVM using Intel oneAPI as a driver for OpenCL.
Each experiment was executed 101 times per version with the goal of comparing the JIT compiled code (after the warmup phase in JVM). Besides, note that in the case of the execution with TornadoVM, the TornadoVM JIT compiler optimises and compiles the Java bytecode to OpenCL and CPU binary in the first run.
Speedups vs Java Single Threaded
The following performance plot shows the speedups of each version (Java Parallel Streams, TornadoVM using OCK and TornadoVM using oneAPI for CPUs) versus Java Single Threaded. The reported value is the average of the median of the 101 iterations.
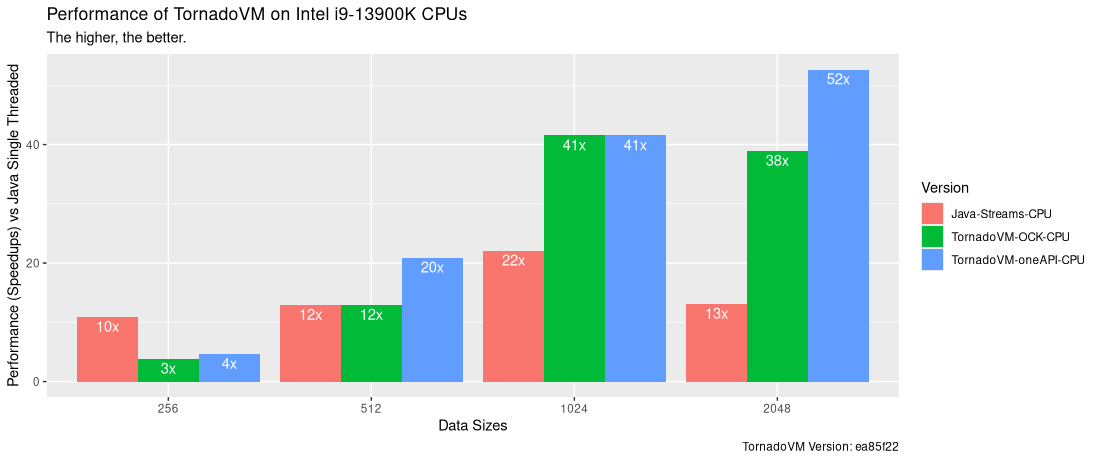
The x-axis shows the input data size for the Matrix Multiplication, respectively for 256, 512, 1024 and 2048 square matrices. The y-axis shows speedup of each version compared to Java Single Threaded. Thus, the higher, the better.
As we can see, when we run with small data sizes, the Java Parallel Stream version performs faster than the parallel OpenCL drivers for TornadoVM (both Intel oneAPI and OCK). However, for larger data sizes, TornadoVM outperforms Java Parallel Streams, achieving speedups of up to 52x compared to Java Single-Threaded, and up to 4x faster than Java Parallel Streams for the same CPU. Worth mentioning that OCK is able to autovectorize the code from scalar OpenCL C code.
Regarding OCK, we see that it is generally slower than running the generated OpenCL program with Intel oneAPI. This is due to different optimizations being applied. As the Intel oneAPI is closed source, we do not know exactly which optimizations are being performed, but OCK is in active development and, hopefully, it will become faster overtime with clever compiler optimizations.
Data Distribution
But how are all the runs distributed? The following Figure shows the data distribution of the runtime for each configuration and data size, including the first iteration, in which TornadoVM compiles and optimises the code for CPUs. From left to right, each plot shows the runtime for Java Single-Threaded, Java Parallel Streams, TornadoVM with OCK and TornadoVM with Intel oneAPI.
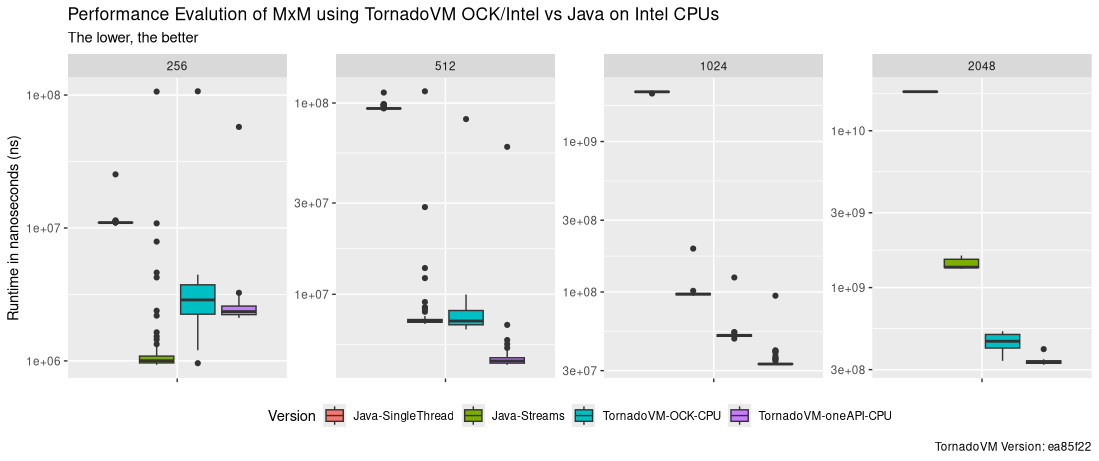
As we see, TornadoVM runs the first iteration faster than the Java sequential code for all the reported data sizes except for the smallest one. In addition, TornadoVM runs faster than Java Streams from size 1024, even from the first iteration.
What can we get from this data?
From this experiment, we see that TornadoVM can outperform the execution of the Java multi-core Parallel Streams of up to 4x using the same Intel CPU for the large data sizes. Note that, in the case of the OCK, the OpenCL JIT compiler is able to auto-vectorize the code, and we can’t confirm this for the Intel oneAPI compiler, since the project is closed source, but quite likely, the code is also auto-vectorized.
If the input data is not big enough, the execution with Java and Java parallel streams should be fast enough compared to TornadoVM using OCK and Intel oneAPI underneath.
TornadoVM for ARM CPUs & Performance Evaluation
Let’s discuss now how to get TornadoVM running on ARM CPUs. We will show you the setup using an ARM Neoverse V2 CPU processor, which is included into the NVIDIA GH200 Grace Hopper Superchip system.
Configuring LLVM for ARM
We need to configure LLVM for Aarch64:
git clone https://github.com/llvm/llvm-project.git
llvmDIR=$PWD
cd llvm

#Remember to switch to the 18.x branch
git checkout release/18.x

cmake llvm -GNinja \
-Bbuild-aarch64 \
-DCMAKE_BUILD_TYPE=Release \
-DCMAKE_INSTALL_PREFIX=$PWD/build-aarch64/install \
-DLLVM_ENABLE_PROJECTS="clang;lld" \
-DLLVM_TARGETS_TO_BUILD='AArch64'

ninja -C build-aarch64 install
Configure OCK
In a new directory we clone the repo and install OCK as follows:
git clone https://github.com/codeplaysoftware/oneapi-construction-kit
cd oneapi-construction-kit

cmake . -GNinja \
-Bbuild-aarch64 \
-DCMAKE_BUILD_TYPE=Release \
-DCMAKE_INSTALL_PREFIX=$PWD/build-aarch64/install \
-DCA_ENABLE_API=cl \
-DCA_ENABLE_DOCUMENTATION=OFF \
-DCA_LLVM_INSTALL_DIR=/home/jfumero/ock/llvm-project/build-aarch64/install

ninja -C build-aarch64 install
Finally, we need to update the OpenCL ICD env variable to load the libCL.so from OCK. We can do it via either:
a. Adding a new file on Linux under the /etc/OpenCL/vendors/ called ock.icd with the path to the libCL.so from OCK:
<path-to--ock->/oneapi-construction-kit/build-aarch64/install/lib/libCL.so
b. Updating the OCL_ICD_VENDORS env variable with a new directory that includes the new ICD files. For example:
For example:
export OCL_ICD_VENDORS=/home/jfumero/TornadoVM/icd-ock/
Configure TornadoVM for ARM and OCK
cd TORNADOVM_ROOT
./bin/tornadovm-installer --jdk jdk21 --backend=opencl,spirv
source setvars.sh
Then we can run TornadoVM:
tornado --devices

Number of Tornado drivers: 1
Driver: OpenCL
  Total number of OpenCL devices  : 2
  Tornado device=0:0  (DEFAULT)
        OPENCL --  [NVIDIA CUDA] -- GH200 480GB
                Global Memory Size: 95.0 GB
                Local Memory Size: 48.0 KB
                Workgroup Dimensions: 3
                Total Number of Block Threads: [1024]
                Max WorkGroup Configuration: [1024, 1024, 64]
                Device OpenCL C version: OpenCL C 1.2

  Tornado device=0:1
        OPENCL --  [ComputeAorta] -- ComputeAorta AArch64
                Global Memory Size: 143.5 GB
                Local Memory Size: 32.0 KB
                Workgroup Dimensions: 3
                Total Number of Block Threads: [1024]
                Max WorkGroup Configuration: [1024, 1024, 1024]
                Device OpenCL C version: OpenCL C 1.2 Clang 18.1.8
Performance on ARM Neoverse V2 (NVIDIA GraceHopper Superchip System)
Setup
Similarly to the performance evaluation on the Intel CPUs, we also evaluate the performance of OCK using the same matrix multiplication benchmark on the ARM Neoverse V2 CPU processor. This processor is included into the NVIDIA GraceHopper Superchip system, which shares memory with the GH200 GPU.
The Linux system used is Ubuntu 22.04.4 LTS with the kernel 6.2.0-1015-nvidia-64k. We used OpenJDK 21 build 21.0.3+7-LTS-152. The TornadoVM version used is 1.0.8-dev, commit ea85f22.
For this experiment, we installed the OCK to run on ARM CPUs and compared with Java Single-Threaded and Java Parallel Streams running on the same CPU. Note that Intel oneAPI is not available for ARM systems.
Evaluation
The following Figure shows the speeds of each version compared to Java Single-Threaded (the higher, the better). The speedups are obtained by computing the median value of the 101 iterations. In contrast with Intel CPU systems, the execution on the CPU using Java multithreaded performs faster than TornadoVM dispatching OpenCL via OCK. Only for the largest data size, TornadoVM can benefit in the overall execution compared to Java Parallel Streams, offering up to 16% faster executions.
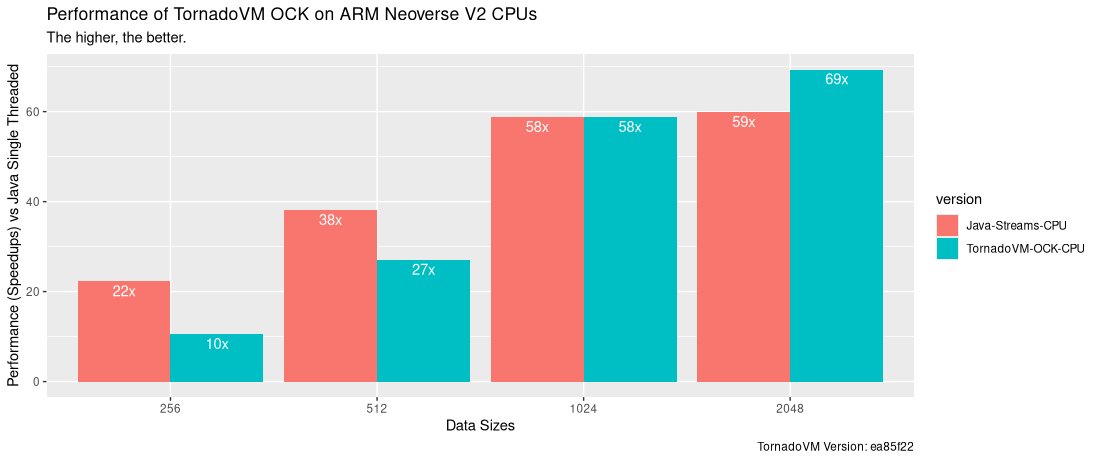
We haven’t looked at the details, and there is plenty of room for analysis at this point, but the Java JIT compiler and the Parallel Stream implementation do a very good job for the ARM ecosystem, at least for this processor.
Runtime Data Distribution
The following Figure shows the runtime distribution for all tests executed (the lower, the better). For each data size, the boxplot for the Java Single-Threaded, Java Parallel Stream and TornadoVM OCK on the CPU are shown. Note that the y-axis is in log-scale.
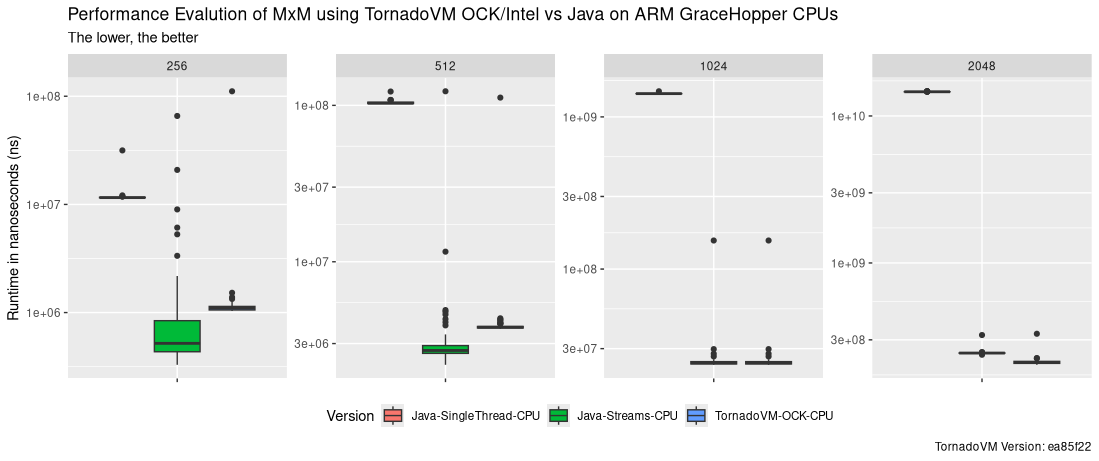
As we can see, the Java Parallel Stream version using OpenJDK 21 performs faster than TornadoVM with OCK, and only when running the largest data size for the matrix multiplication, TornadoVM OCK outperforms the execution with Java Parallel Streams. Note that even the first iteration of TornadoVM is also a bit slower than the Java Parallel Stream version.
TornadoVM for RISC-V & Debug Modes
Finally, let’s configure OCK to run on RISC-V accelerators and use them as devices for TornadoVM. In the case of RISC-V, since we do not have any hardware available, it can run on emulation mode from an X86/64 machine.
To do so, OCK comes with a simulator, called Codeplay Reference Silicon (RefSi), which is based on SPIKE, and it can be used in combination with our Java/TornadoVM programs to run on RISC-V with Vector Instruction extensions! How cool is this?
Configuring LLVM for RISC-V
We need to install the following dependencies:
sudo dnf install dtc ninja doxygen python3-pip git cmake spirv-tools dtc
sudo pip3 install lit cmakelint
Then, we need to reconfigure LLVM for RISC-V:
mkdir ock
cd ock
baseDIR=$PWD
git clone --depth 1 --branch=release/18.x https://github.com/llvm/llvm-project.git llvm
cd llvm-project
llvmDIR=$PWD

cmake llvm -GNinja \
-Bbuild-riscv \
-DCMAKE_BUILD_TYPE=Release \
-DCMAKE_INSTALL_PREFIX=$PWD/build-riscv/install \
-DLLVM_ENABLE_PROJECTS="clang;lld" \
-DLLVM_TARGETS_TO_BUILD='X86;RISCV'

ninja -C build-riscv install
Configuring OCK for RISC-V
## Obtain OCK
cd $baseDIR
git clone --depth 1 https://github.com/uxlfoundation/oneapi-construction-kit
cd oneapi-construction-kit
Then build/install OCK. The following configuration does not enable DEBUG information:
cmake -GNinja \
-Bbuild-riscv \
-DCA_RISCV_ENABLED=ON \
-DCA_MUX_TARGETS_TO_ENABLE="riscv" \
-DCA_LLVM_INSTALL_DIR=$llvmDIR/build-riscv/install \
-DCA_ENABLE_HOST_IMAGE_SUPPORT=OFF \
-DCA_ENABLE_API=cl \
-DCA_CL_ENABLE_ICD_LOADER=ON \
-DCMAKE_INSTALL_PREFIX=$PWD/build-riscv/install

ninja -C build-riscv install
If we want to enable DEBUG information to dump the Assembly code and all the HAL (Heterogeneous Abstraction Layer) calls, we need to configure OCK using -DCA_ENABLE_DEBUG_SUPPORT=ON -DCA_DEBUG_SUPPORT=ON as follows:
cmake -GNinja \
-Bbuild-riscv-debug \
-DCA_ENABLE_DEBUG_SUPPORT=ON \
-DCA_DEBUG_SUPPORT=ON \
-DCA_RISCV_ENABLED=ON \
-DCA_MUX_TARGETS_TO_ENABLE="riscv" \
-DCA_LLVM_INSTALL_DIR=$llvmDIR/build-riscv/install \
-DCA_ENABLE_HOST_IMAGE_SUPPORT=OFF \
-DCA_ENABLE_API=cl \
-DCA_CL_ENABLE_ICD_LOADER=ON \
-DCMAKE_INSTALL_PREFIX=$PWD/build-riscv-debug/install

ninja -C build-riscv-debug install
Next, we need to configure the Linux system to use the new OpenCL installation. There are various ways to get this. One of them is updating the folder /etc/OpenCL/vendors/ with a new file that contains the path to the libCL.so installation.
sudo vim /etc/OpenCL/vendors/ock.icd
And we add the following line to the file: use your absolute path to the libCL.so file:
<your-path-to-oneapi-construction-kit>/oneapi-construction-kit/build-x86_64/install/lib/libCL.so
Running TornadoVM on RISC-V
To enable the debug information when running our TornadoVM applications, we need to export the following env variables as follows:
export CA_RISCV_DUMP_ASM=1 ## Print Assembly code
export CA_HAL_DEBUG=1      ## Print calls to HAL
Let’s run some examples:
export CA_RISCV_DUMP_ASM=1  ## Print Assembly code
export CA_HAL_DEBUG=1       ## Print calls to HAL

$ tornado --printKernel --jvm="-Ds0.t0.device=0:3" --threadInfo -m tornado.examples/uk.ac.manchester.tornado.examples.arrays.ArrayAddInt

refsi_hal_device::mem_alloc(size=4, align=128) -> 0x9800ff80
refsi_hal_device::mem_alloc(size=512, align=128) -> 0x9800fd80
refsi_hal_device::mem_alloc(size=56, align=128) -> 0x9800fd00
refsi_hal_device::mem_alloc(size=56, align=128) -> 0x9800fc80
refsi_hal_device::mem_alloc(size=56, align=128) -> 0x9800fc00
refsi_hal_device::mem_alloc(size=24, align=128) -> 0x9800fb80

...

.LBB0_9:
addi	sp, s0, -80
ld	ra, 72(sp)
ld	s0, 64(sp)
ld	s2, 56(sp)
ld	s3, 48(sp)
ld	s4, 40(sp)
ld	s5, 32(sp)
ld	s6, 24(sp)
ld	s7, 16(sp)
ld	s8, 8(sp)
ld	s9, 0(sp)
addi	sp, sp, 80
ret
.Lfunc_end0:
.size	"add.mux-kernel-wrapper", .Lfunc_end0-"add.mux-kernel-wrapper"

.type	notes_global,@object
.section	notes,"a",@progbits
.globl	notes_global
notes_global:
.size	notes_global, 192

.ident	"clang version 18.1.8 (git@github.com:llvm/llvm-project.git 3b5b5c1ec4a3095ab096dd780e84d7ab81f3d7ff)"
.section	".note.GNU-stack","",@progbits
refsi_hal_device::mem_write(dst=0x9800fd00, size=56)
refsi_hal_device::mem_write(dst=0x9800fc80, size=56)
refsi_hal_device::mem_write(dst=0x9800fb80, size=24)
Task info: s0.t0
Backend           : OPENCL
Device            : RefSi G1 RV64 CL_DEVICE_TYPE_ACCELERATOR (available)
Dims              : 1
Global work offset: [0]
Global work size  : [8]
Local  work size  : [8, 1, 1]
Number of workgroups  : [1]

refsi_hal_device::program_find_kernel(name='add.mux-kernel-wrapper') -> 0x00010000
refsi_hal_device::kernel_exec(kernel=0x00010000, num_args=7, global=<8:1:1>, local=<8:1:1>)
refsi_hal_device::pack_arg(offset=0, align=8, value=0x000000009800fb80)
refsi_hal_device::pack_arg(offset=8, align=8, value=0x000000009800ff80)
refsi_hal_device::pack_arg(offset=16, align=8, value=0x0000000000000008)
refsi_hal_device::pack_arg(offset=24, align=8, value=0x000000009800fd80)
refsi_hal_device::pack_arg(offset=32, align=8, value=0x000000009800fd00)
refsi_hal_device::pack_arg(offset=40, align=8, value=0x000000009800fc80)
refsi_hal_device::pack_arg(offset=48, align=8, value=0x000000009800fc00)
refsi_hal_device::kernel_exec finished in 0.006 s
refsi_hal_device::mem_read(src=0x9800fc00, size=56)
TornadoVM and OCK spit debug information, such as the generated kernel, the generated assembly, and device in which the application is executed and all the calls to the HAL (Heterogeneous Abstraction Layer) API.
However, if we pay attention, there are no RVV instructions being generated. This is because we need to export the following variable with the vector width:
export CA_RISCV_VF=4
If we run TornadoVM again with the OCK debug information on, we obtain the following:
tornado --printKernel --jvm="-Ds0.t0.device=0:3" --threadInfo -m tornado.examples/uk.ac.manchester.tornado.examples.arrays.ArrayAddInt

…
.LBB0_18:
add	a0, s5, s8
add	a0, a0, s4
vsetvli	zero, zero, e64, m2, ta, ma
vadd.vx	v10, v8, a0
vsetvli	zero, zero, e32, m1, ta, ma
vnsrl.wi	v12, v10, 0
vmsle.vi	v0, v12, 7
vsetvli	zero, zero, e8, mf4, ta, ma
vmv.x.s	a0, v0
andi	a0, a0, 15
beqz	a0, .LBB0_17
slli	a3, s7, 2
add	a2, t3, a3
add	a0, t4, a3
add	a3, a3, t6
vsetvli	zero, zero, e64, m2, ta, ma
vsll.vx	v10, v10, s2
vsra.vx	v10, v10, s2
.LBB0_20:
vsetvli	zero, zero, e32, m1, ta, ma
vle32.v	v12, (a3), v0.t
vle32.v	v13, (a0), v0.t
vadd.vv	v12, v13, v12
vse32.v	v12, (a2), v0.t
vsetvli	zero, zero, e64, m2, ta, ma
vadd.vx	v10, v10, s9
vmsle.vi	v12, v10, 7
vmand.mm	v0, v12, v0
vsetvli	zero, zero, e8, mf4, ta, ma
vmv.x.s	a4, v0
andi	a4, a4, 15
add	a2, a2, a5
add	a0, a0, a5
add	a3, a3, a5
bnez	a4, .LBB0_20
j	.LBB0_17
.Lfunc_end0:
.size	"__vecz_v4_add.mux-kernel-wrapper", .Lfunc_end0-"__vecz_v4_add.mux-kernel-wrapper"

            …

refsi_hal_device::mem_write(dst=0x9800fd00, size=56)
refsi_hal_device::mem_write(dst=0x9800fc80, size=56)
refsi_hal_device::mem_write(dst=0x9800fb80, size=24)
Task info: s0.t0
Backend           : OPENCL
Device            : RefSi G1 RV64 CL_DEVICE_TYPE_ACCELERATOR (available)
Dims              : 1
Global work offset: [0]
Global work size  : [8]
Local  work size  : [8, 1, 1]
Number of workgroups  : [1]
And, if we export the following variable:
export SPIKE_SIM_DEBUG=1
We can even run step by step with a debugger that is included within the RefSi Simulator. How cool is this?
Conclusions
This post has shown the potential of dispatching and running Java and TornadoVM programs on CPUs via the oneAPI Construction Kit (OCK), allowing Java developers to accelerate, not just on GPUs but also on CPUs. This post has shown how to configure OCK for three types of CPUs: Intel, ARM and RISC-V CPU.
Furthermore, in this post we have analysed the performance of the Matrix Multiply applications (widely used these days for AI and Deep Learning workloads) on Intel CPUs and ARM CPUs, and compared the performance against Java Parallel Streams with OpenJDK, and Intel oneAPI, achieving speedups of up to 4x compared to Java Parallel Streams.
In summary, running TornadoVM applications with OCK and Intel oneAPI on Intel CPUs performs better than running with Java and OpenJDK. However, this is not the case for ARM CPU systems.
Hardware systems are now fully heterogeneous, containing a wide range of specialized systems for specialized tasks. TornadoVM can run with multiple configurations and on multiple devices. Besides, TornadoVM can run with the help of the dynamic reconfiguration, which is a feature that we did not explore in this post, thanks to which TornadoVM explores the fastest device by itself and adapts the application to the fastest performing device. This means that TornadoVM is able to select the fastest accelerator when using the Java runtime for the execution.
The ability to select and combine different parallel runtimes is the key to achieve higher performance, in a way, TornadoVM is able to select the right tool/runtime for the right workload.
Acknowledgments
I would like to thank Colin Davidson from Codeplay for the support regarding the oneAPI Construction Kit for TornadoVM. I also thank the University of Pisa for the access to the NVIDIA GH200 GraceHopper Superchip system through the AERO EU Project. Furthermore, thanks to Christos Kotselidis and Thanos Stratikopoulos from the University of Manchester for their constructive feedback.