Running TornadoVM within IntelliJ
Published:
Running Java applications from existing IDEs can be a cumbersome process, especially if we need to specify shared libraries. We need to know exactly how to change the configuration of our application launchers and which parameters to use. In this post, I will explain how to get access to NVIDIA and Intel-integrated GPUs from IntelliJ using TornadoVM. Furthermore, I will explain how to enable debugging information from the TornadoVM runtime and compilers, so developers can track where and how the code is executed on the target hardware accelerators.
I am going to assume that you have already installed TornadoVM in your system. If you haven’t done so, the following video can help you configure and install TornadoVM on your system:
We are going to use Maven and an example project from GitHub that contains different use cases of TornadoVM.
To compile and run TornadoVM applications within the IDE, we need to follow two steps: a) adding the Maven dependency to our project, and b) configuring new application launchers within IntelliJ that contains all the Java flags that are needed to run applications on modern hardware.
1. Adding the TornadoVM Maven Dependency
The first step is to add the maven dependency to obtain the TornadoVM APIs. To do so, we add the following code in our pom.xml file:
<repositories>
 <repository>
     <id>universityOfManchester-graal</id>
     <url>https://raw.githubusercontent.com/beehive-lab/tornadovm/maven-tornadovm</url>
 </repository>
</repositories>

<dependency>
  <groupId>tornado</groupId>
  <artifactId>tornado-api</artifactId>
  <version>1.0.1-dev</version>
</dependency>

<dependency>
  <groupId>tornado</groupId>
  <artifactId>tornado-matrices</artifactId>
  <version>1.0.1-dev</version>
</dependency>
2. Obtain all the Java flags to run TornadoVM Applications
Importing the Java dependencies in our pom file allows us to program Java applications using the TornadoVM APIs. However, to run our Java programs with the TornadoVM runtime, we also need to specify a few Java options in the application launcher.
This is because the TornadoVM runtime needs to access the shared libraries (.so libraries) that contain the dispatch code and communication with the corresponding hardware drivers (e.g., OpenCL, CUDA Driver API, and Level Zero) as well as the class paths for the API implementations. Thus, we need TornadoVM to be installed in our system. Once the installation is complete, we obtain all Java flags that are needed to run TornadoVM programs using the --printJavaFlags option.
$ tornado --printJavaFlags

-server \
-XX:-UseCompressedOops \
-XX:+UnlockExperimentalVMOptions \
-XX:+EnableJVMCI \
-XX:-UseCompressedClassPointers \
--enable-preview \
-Djava.library.path=/home/juan/tornadovm/TornadoVM/bin/sdk/lib  \
--module-path .:/home/juan/tornadovm/TornadoVM/bin/sdk/share/java/tornado \
-Dtornado.load.api.implementation=uk.ac.manchester.tornado.runtime.tasks.TornadoTaskGraph \
-Dtornado.load.runtime.implementation=uk.ac.manchester.tornado.runtime.TornadoCoreRuntime \
-Dtornado.load.tornado.implementation=uk.ac.manchester.tornado.runtime.common.Tornado \
-Dtornado.load.device.implementation.opencl=uk.ac.manchester.tornado.drivers.opencl.runtime.OCLDeviceFactory\
-Dtornado.load.device.implementation.ptx=uk.ac.manchester.tornado.drivers.ptx.runtime.PTXDeviceFactory\
-Dtornado.load.device.implementation.spirv=uk.ac.manchester.tornado.drivers.spirv.runtime.SPIRVDeviceFactory\
-Dtornado.load.annotation.implementation=uk.ac.manchester.tornado.annotation.ASMClassVisitor\
-Dtornado.load.annotation.parallel=uk.ac.manchester.tornado.api.annotations.Parallel \
--upgrade-module-path /home/juan/tornadovm/TornadoVM/bin/sdk/share/java/graalJars \
-XX:+UseParallelGC \
@/home/juan/tornadovm/TornadoVM/bin/sdk/etc/exportLists/common-exports \
@/home/juan/tornadovm/TornadoVM/bin/sdk/etc/exportLists/opencl-exports \
--add-modules\
ALL-SYSTEM,tornado.runtime,tornado.annotation,tornado.drivers.common,tornado.drivers.opencl
The flags depend on the installed backend. The ones shown in the code snippet above correspond to my installation using the OpenCL backend. This is important because we could reconfigure TornadoVM at any point to install different backends (e.g., the CUDA or SPIR_V backends). If so, then we need to rerun the command with --printJavaFlags option and copy the updated list of Java flags.
These Java flags are useful to create a new IntelliJ configuration application launcher.
Edit -> Configurations
Then we click on Modify Options, and Add VM options.
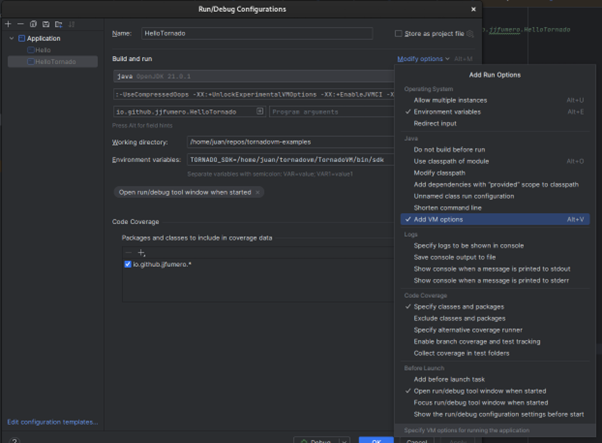
A new field will appear to be complete with new JVM options. In this field, we copy the Java flags that were emitted by the TornadoVM script after the installation.
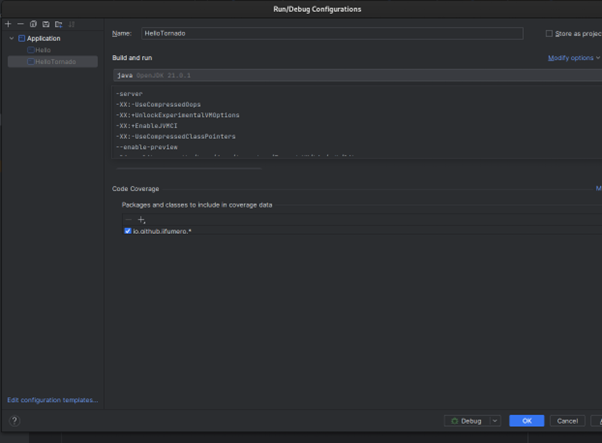
After the configuration of the launcher, And we are ready to run! Just click in play  , and done.
2.1 Adding Debugging Options
Now that we have enabled TornadoVM to be executed within IntelliJ, we can add specific options to debug and profiler our programs on GPUs and FPGAs. Let’s look at a few of them:
Enable TornadoVM Device Information being used
This option enables TornadoVM to dump the hardware accelerator that is used every time a kernel is launched. It also specifies the number of threads that were deployed and the configuration grids (as in the number of thread-blocks).
-Dtornado.threadInfo=True
Enable the kernel
This option enables the TornadoVM runtime to dump the generated low-level kernel that will be compiled and deployed on the target hardware accelerator. Depending on the backend that was configured during the installation of the TornadoVM project, we will see the kernel expressed in different programming GPU/low-level languages (e.g., OpenCL, CUDA PTX or disassembled SPIR-V code).
-Dtornado.print.kernel=True
Enable the internal profiler
The following option enables the TornadoVM’s profiler. This profiler dumps the compilation times (Graal compilation time and GPU driver’s compilation), as well as the time to run the kernel and the time to perform all copies from the main host (CPU) to the GPU and viceversa. All timers are specified in nanoseconds.
-Dtornado.profiler=True
Now you can start programming and running TornadoVM applications that can access modern hardware within the IDE. Happy coding!
This post is also available as a tutorial on YouTube in video format: https://www.youtube.com/watch?v=dKfN1GcIjgA