Multi-device & Multi-backend TornadoVM
Published:
Key Takeaways
- TornadoVM can dynamically switch execution from one accelerator to another, even using different backend technologies, such as the migration of the execution from CUDA PTX device to an Intel device using SPIR-V.
- TornadoVM can run multiple tasks concurrently on different hardware accelerators, even with different backends with the end goal of increasing performance.
- This post shows, via examples, how developers can benefit from these features, and reason about performance using the TornadoVM profiler to help us tune our applications.
Introduction
In a previous post, I explained in detail the TornadoVM programming model for offloading Java data-parallel programs into accelerators, and I showed some demos performing task migration from one device to another using only one backend.
In this post I will go a step further and explain how TornadoVM developers can switch across multiple devices and backends at runtime, as well as run multiple tasks on multiple devices concurrently, even with different backends.
I am going to show you these features via two example applications. In the first example, I am going to illustrate a Client/Server application in which the server is waiting for client connections to run a predefined data parallel application on a hardware accelerator, but the hardware accelerator is given by the client, and the client can select and change the execution to any device at runtime.
The second example is about computational photography. I will illustrate an application that takes an input JPEG image and creates two output JPEG images: one with a blur effect, and another one with a black-and-white filter. We will process this computation on different hardware accelerators concurrently and analyse how we can tune our applications to increase performance.
In the case you prefer it, I do have a video-version of this tutorial on YouTube
Setup
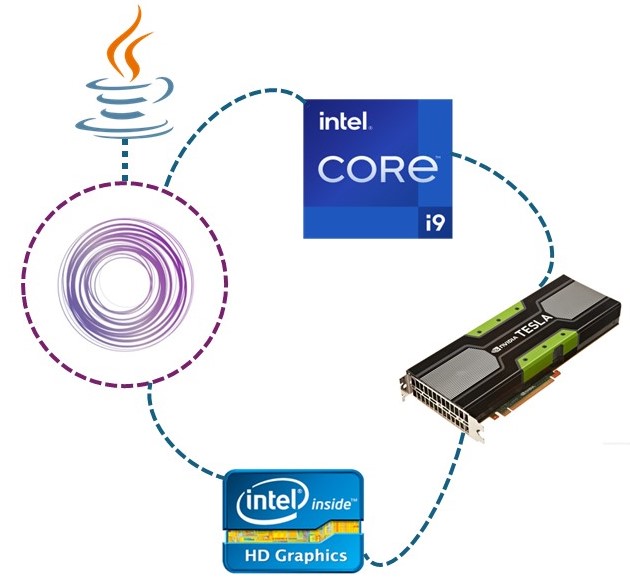
Before we start with the examples, I am going to show you the TornadoVM configuration and the setup I am using. I configured my machine to use all backends that TornadoVM currently supports, at least in the version 1.0, which are the OpenCL backend, the PTX backend and the SPIR-V backend.
If you need to review how TornadoVM is configured, you can check the following video, which explains step by step how to install it for different operating systems and different hardware accelerators. https://www.youtube.com/watch?v=F_0E-zFe2CU
To enable TornadoVM with multiple backends, we compile the TornadoVM project as follows:
$ source setvars.sh
$ make BACKEND=spirv,opencl,ptx
In addition, I installed Intel oneAPI to get access to the Intel CPU as a hardware accelerator via the OpenCL backend. If I query all devices that TornadoVM can run, I obtain the following:
tornado --devices
WARNING: Using incubator modules: jdk.incubator.vector

Number of Tornado drivers: 3
Driver: SPIRV
  Total number of SPIRV devices  : 1
  Tornado device=0:0  (DEFAULT)
	SPIRV -- SPIRV LevelZero - Intel(R) UHD Graphics 770
		Global Memory Size: 24.9 GB
		Local Memory Size: 64.0 KB
		Workgroup Dimensions: 3
		Total Number of Block Threads: [512]
		Max WorkGroup Configuration: [512, 512, 512]
		Device OpenCL C version:  (LEVEL ZERO) 1.3

Driver: OpenCL
  Total number of OpenCL devices  : 4
  Tornado device=1:0
	OPENCL --  [NVIDIA CUDA] -- NVIDIA GeForce RTX 3070
		Global Memory Size: 7.8 GB
		Local Memory Size: 48.0 KB
		Workgroup Dimensions: 3
		Total Number of Block Threads: [1024]
		Max WorkGroup Configuration: [1024, 1024, 64]
		Device OpenCL C version: OpenCL C 1.2

  Tornado device=1:1
	OPENCL --  [Intel(R) OpenCL Graphics] -- Intel(R) UHD Graphics 770
		Global Memory Size: 24.9 GB
		Local Memory Size: 64.0 KB
		Workgroup Dimensions: 3
		Total Number of Block Threads: [512]
		Max WorkGroup Configuration: [512, 512, 512]
		Device OpenCL C version: OpenCL C 1.2

  Tornado device=1:2
	OPENCL --  [Intel(R) OpenCL] -- 12th Gen Intel(R) Core(TM) i7-12700K
		Global Memory Size: 31.1 GB
		Local Memory Size: 32.0 KB
		Workgroup Dimensions: 3
		Total Number of Block Threads: [8192]
		Max WorkGroup Configuration: [8192, 8192, 8192]
		Device OpenCL C version: OpenCL C 3.0

  Tornado device=1:3
	OPENCL --  [Intel(R) FPGA Emulation Platform for OpenCL(TM)] -- Intel(R) FPGA Emulation Device
		Global Memory Size: 31.1 GB
		Local Memory Size: 256.0 KB
		Workgroup Dimensions: 3
		Total Number of Block Threads: [67108864]
		Max WorkGroup Configuration: [67108864, 67108864, 67108864]
		Device OpenCL C version: OpenCL C 1.2

Driver: PTX
  Total number of PTX devices  : 1
  Tornado device=2:0
	PTX -- PTX -- NVIDIA GeForce RTX 3070
		Global Memory Size: 7.8 GB
		Local Memory Size: 48.0 KB
		Workgroup Dimensions: 3
		Total Number of Block Threads: [2147483647, 65535, 65535]
		Max WorkGroup Configuration: [1024, 1024, 64]
		Device OpenCL C version: N/A
This is great, because I can potentially run on a multi-core CPU (by selecting the device 1:2 from my system), or select the NVIDIA RTX 3070 using the PTX backend by selecting the device 2:0. Notice that the ordering in which you see the devices might be different in your system. It really depends on the hardware accelerators you have installed and the drivers on your system. With the setup and configuration out of the way, let’s now focus on the first application to explain dynamic task-migration.
Client/Server Multi-backend Device Task Migration
The first example that I am going to show you illustrates task migration across different devices and backends in a Client/Server application. All examples explained in this tutorial can be found on GitHub.
The following diagram shows a high-level overview of the workflow of the application as well as the interaction between the server and client applications.
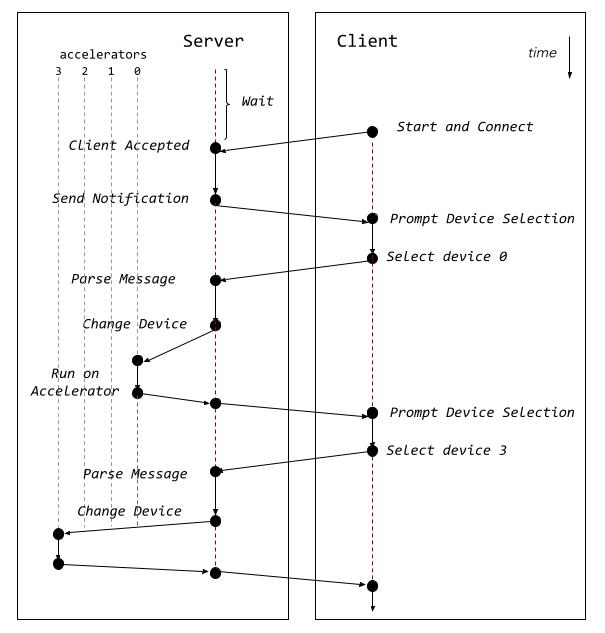
The server application starts running and waits for a client to connect. Once a client connects to the server, the server sends a notification back to the client to start writing the device on which the application should run. In our example, the server runs a simple vector addition, and it has the TornadoVM task graph and the TornadoVM execution plan already instantiated at the time of receiving connections from the client.
Then, the client application selects a device in the format backendIndex:deviceIndex and sends the response to the server. Then, the server parses the answer and changes the device of the execution plan by using the following API:
TornadoDevice device = TornadoExecutionPlan.getDevice(backendIndex, deviceIndex);
executionPlan.withDevice(device);
Finally, the server runs the application by invoking the execute() method from the TornadoExecutionPlan API:
executionPlan.execute();
The server application is the one that has access to all hardware accelerators. The diagram shows a list of accelerators (0 to 3) but this could be any compatible TornadoVM device, such as a GPU, a CPU, an integrated GPU, etc.
Once the application finishes the execution on the targeted hardware accelerator, the server sends a new message to the client to prompt another device. This process repeats until the client disconnects from the server.
The whole application is available on GitHub.
We can start running the two Java processes into two different terminals, one for the server and one for the client:
# terminal 1
$ ./runServer.sh
tornado --printKernel --threadInfo -cp target/tornadovm-examples-1.0-SNAPSHOT.jar io.github.jjfumero.taskmigration.Server

Server Example
And, in another terminal, we run the client:
$ ./runClient.sh
tornado -cp target/tornadovm-examples-1.0-SNAPSHOT.jar io.github.jjfumero.taskmigration.Client

Connecting to host 127.0.0.1 on port 8081.
[CLIENT] <Backend:Device> :
Now, we can select the device we want from the list of devices that are accessible from the server node, which is the one that runs the TornadoVM Execution Plans on the hardware accelerators.
We can start by selecting 1:0, which in my case will trigger the execution on the RTX 3070 using the OpenCL backend.
[CLIENT] <Backend:Device> : 1:0
Then, on the server side, we will see a bunch of messages that print the generated kernel and some information about the thread deployment and the device that was used. This is because we are running the server with the options ` –printKernel –threadInfo` of TornadoVM to dump the generated code and trace the device that was used.
$
     *((__global float *) ul_10)  =  f_11;
    i_12  =  i_2 + i_4;
    i_4  =  i_12;
  }  // B2
  // BLOCK 3
  return;
}  //  kernel

Task info: s0.t0
        Backend           : OPENCL
        Device            : NVIDIA GeForce RTX 3070 CL_DEVICE_TYPE_GPU (available)
        Dims              : 1
        Global work offset: [0]
        Global work size  : [256]
        Local  work size  : [256, 1, 1]
        Number of workgroups  : [1]
That’s great, TornadoVM selects the device we want. What happens is that, the first time we execute on a particular accelerator (e.g., on a particular GPU), TornadoVM will perform the JIT compilation (from Java to the target backend-code) and run the parallel application on the selected device.
Now let’s change the execution to another device using a different backend. For example, from my configuration, the device 0:0 is the Intel HD Graphics using the SPIR-V backend.
From the client:
[CLIENT] <Backend:Device> : 0:0
From the server:
    …
    OpBranch %B1_kernel0
    %B3_kernel0 = OpLabel
    OpBranch %return_kernel0
    %return_kernel0 = OpLabel
    OpReturn
    OpFunctionEnd


Task info: s0.t0
        Backend           : SPIRV
        Device            : SPIRV LevelZero - Intel(R) UHD Graphics 770 GPU
        Dims              : 1
        Global work offset: [0]
        Global work size  : [256]
        Local  work size  : [256, 1, 1]
        Number of workgroups  : [1]
Note that we even see different code being generated. In this case, it is actually disassembled SPIR-V.
Let’s now change to an Intel CPU. From the client:
[CLIENT] <Backend:Device> : 1:2
Message from the server:
 …     i_9  =  i_17;
  }  // B2
  // BLOCK 3
  return;
}  //  kernel

Task info: s0.t0
        Backend           : OPENCL
        Device            : 12th Gen Intel(R) Core(TM) i7-12700K CL_DEVICE_TYPE_CPU (available)
        Dims              : 1
        Global work offset: [0]
        Global work size  : [20]
        Local  work size  : null
        Number of workgroups  : [0]
This simple and small example shows how TornadoVM can dynamically switch accelerators using different backends with a very simple API. Let’s now take a look at the second application to do something more useful, compute a multi-task application on multiple hardware accelerators concurrently.
Multi-Image Processing on Multiple Accelerators: Blur Filter with Black And White Processing
In the second example, I want to illustrate how developers can execute task graphs using multiple hardware accelerators concurrently. Each accelerator can process a different task.
But, to do this, we must be careful with sharing data across tasks. If this is the case, we might introduce a data dependency between one task and another, and, currently, as in the TornadoVM 1.0 version, it does not support the automatic detection of data dependence across different tasks. Thus, it is the responsibility of the developer to not introduce data dependence if we want to enable the concurrent multi-device feature of TornadoVM 1.0. The following application does not have data dependence across tasks in a Task Graph.
The following figure illustrates the workflow of our image processor with multiple filters: one filter to blur the image and another filter to transform the original image to black and white.
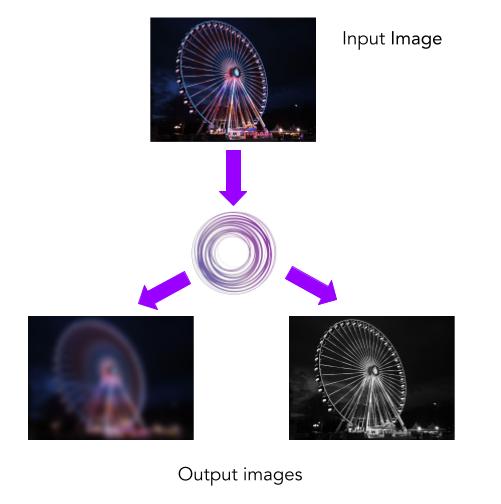
Our input is an image in JPEG format and we can divide our pipeline into two big tasks: one task for the black-and-white image transformation, and another task for the image blur effect. The second task can be, in turn, divided into three subtasks to process the Red, Green and Blue (RGB) channels of an image in a separate task. Thus, we end up with a task-graph that contains four tasks:
- Task 1: Black and White Image Transformation
- Task 2: Blur effect for the Red channel
- Task 3: Blur effect for the Green channel
- Task 4: Blur effect for the Blue channel
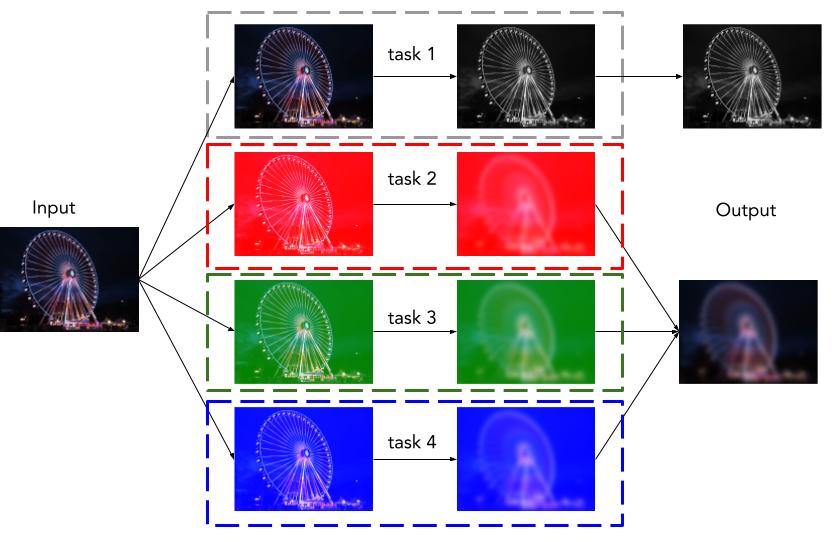
As mentioned earlier, all tasks can operate independently, meaning that there is no data dependency between one task to another. We can compose the final image after all parallel processing has been done.
parallelFilter = new TaskGraph("imageProcessor") //
  .transferToDevice(DataTransferMode.EVERY_EXECUTION, imageRGB, redChannel, greenChannel, blueChannel, filter)
  .task("blackAndWhite", MultiImageProcessor::blackAndWhiteTransform, imageRGB, w, h)
  .task("blurRed", MultiImageProcessor::compute, redChannel, redFilter, w, h, filter, FILTER_WIDTH)
  .task("blurGreen", MultiImageProcessor::compute, greenChannel, greenFilter, w, h, filter, FILTER_WIDTH)
  .task("blurBlue", MultiImageProcessor::compute, blueChannel, blueFilter, w, h, filter, FILTER_WIDTH)
  .transferToHost(DataTransferMode.EVERY_EXECUTION, redFilter, greenFilter, blueFilter, imageRGB);

ImmutableTaskGraph immutableTaskGraph = parallelFilter.snapshot();
executionPlan = new TornadoExecutionPlan(immutableTaskGraph);
As we saw in the previous example, we can change device with the following API call in TornadoVM:
TornadoDevice device = TornadoExecutionPlan.getDevice(backendIndex, deviceIndex);
executionPlan.withDevice(device);
But this will change the device for all tasks within our compute-graph. What if we want to assign a different device per task? Recently, TornadoVM expanded the API to allow this:
executionPlan.withDevice("<ID>", deviceInstance)
For example:
TornadoDevice device0 = TornadoExecutionPlan.getDevice(0, 0);  // spir-v
TornadoDevice device1 = TornadoExecutionPlan.getDevice(1, 0);  // opencl 0
TornadoDevice device2 = TornadoExecutionPlan.getDevice(1, 1);  // opencl 1
TornadoDevice device3 = TornadoExecutionPlan.getDevice(1, 2);  // opencl 2
TornadoDevice device4 = TornadoExecutionPlan.getDevice(2, 0);  // ptx
executionPlan.
  .withDevice("imageProcessor.blackAndWhite", device0)
  .withDevice("imageProcessor.blurRed", device1)
  .withDevice("imageProcessor.blurGreen", device2)
  .withDevice("imageProcessor.blurBlue", device4);
And then we can call execute:
executionPlan.execute();
Done! As easy as that. But, there is a problem. If we see the logs, we see that while each task was executed on different hardware accelerators with different backends, the execution plan executed each task in a sequential manner, meaning that the TornadoVM first launches the first parallel task, waits until it finishes, then launches the second and so on. This is the default behaviour, but we can alter this and force TornadoVM to execute all tasks concurrently on different devices, or even concurrently on the same device. To do so, we enable the task graph to execute concurrently as follows:
executionPlan.withConcurrentDevices().execute();
So now, if we run the execution plan again, the TornadoVM runtime will launch different Java threads to handle the execution concurrently on different hardware accelerators. How cool is this?
Performance
Let’s measure the performance for this application using an input image of 5776 × 4336 pixels. Each pixel will be processed independently by a GPU/Accelerator thread. Before measuring with a mix of devices, let’s first measure the whole application (all tasks in a task graph) running on the same device.
My Hardware Setup:
I am using a PC desktop with i7-12700K running Fedora Linux with the Kernel 6.7.7-200.fc39. Besides, I am using an RTX 3070 GPU running with the latest driver available at the time of writing this post (545.29.02) and CUDA 12.3. For the Intel integrated graphics and the Intel CPU, I am using the OpenCL runtime 23.35.27191.9 and Intel oneAPI 2024.0. The Java version I am using is: OpenJDK 21 build 21.0.2+13-LTS-58.
I measured performance by running each application 100 times and reported the average (AVG function) for the last 99 iterations. This is because we want to exclude the JIT compilation from the execution in the case of the TornadoVM runs.
Performance vs Java Sequential Implementation (Single Core)
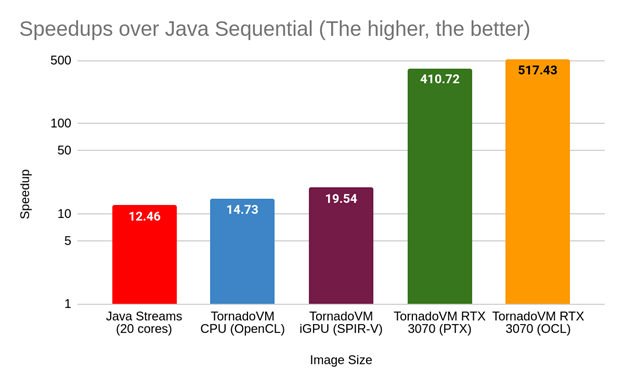
How to read this plot? The x-axis shows different setups (hardware/tech used). From Java Streams running on the CPU (no TornadoVM), to TornadoVM for CPU, integrated GPU and discrete GPUs using different backends. The y-axis shows the speedups against the Java sequential implementation. Thus, the higher, the better. Note that the scale is in log-scale.
Analysis: There are many interesting aspects to consider from this performance graph.
- The performance using TornadoVM on the CPU is a bit higher (1.18x) than Java Streams on the same CPU.
- The Intel Integrated GPU offers higher performance than the Java streams and the CPU implementation of TornadoVM.
- We see that using the same device with a different backend does not necessarily mean achieving the same performance. This is the case for the execution on the RTX 3070 GPU using OpenCL and NVIDIA PTX. Notice that, in the case of TornadoVM, the OpenCL JIT compiler is more mature and implements more optimizations compared to other backends. This is where the device exploration in TornadoVM and different device executions for the same task graph come in handy.
Performance vs Parallel Java Streams
If we change our baseline and measure performance against Java Streams, we obtain the following performance graph:
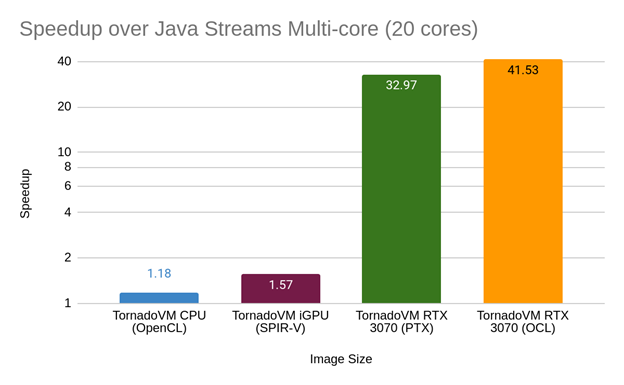
So TornadoVM runs 40x faster than the parallel Java Streams version by running on an NVIDIA RTX 3070 GPU. That’s great, but can we run faster with TornadoVM if we enable the execution on different devices?
Notice that the performance gap between discrete GPUs and the rest for this example is more than 10x. This means that, by mixing different tasks for different devices, unless we use different discrete GPUs that offer similar or the same performance, we are not probably going to notice any difference in performance. Let’s explore this in more detail with the profiler.
Profiling, profiling, and profiling: working Towards Increasing Performance
To understand if we can run faster, we need to look at the profiler and analyse the kernel elapsed timers of each task. Let’s take the fastest configuration, which is the execution of all tasks in a task graph using the RTX 3070 with the OpenCL backend.
I changed the number of iterations to two and analysed the profiler for the second iteration. The reason is that the first iteration includes the time for the JIT compilation.
We can enable the profiler information using the following command:
tornado --enableProfiler console -cp target/tornadovm-examples-1.0-SNAPSHOT.jar io.github.jjfumero.MultiImageProcessor tornado
This will emit a JSON entry every time an execution plan finishes. Each JSON entry contains 2 sections: one global (accumulated timers for all tasks in a task graph), and a “per-task” section. Each task is a new sub-block of the JSON entry. All timers are specified in nanoseconds and data transfers in bytes.
From the profiler, we see that the three tasks that execute the Blur Filter are the most time-consuming (between 37 and 43 milliseconds to complete on the GPU. The black and white filter takes 0.5 milliseconds to complete on the GPU.
{
    "imageProcessor": {
        "COPY_IN_TIME": "35559744",
        "TOTAL_KERNEL_TIME": "118908768",
        "COPY_OUT_TIME": "28077984",
        "TOTAL_DISPATCH_DATA_TRANSFERS_TIME": "695904",
        "TOTAL_TASK_GRAPH_TIME": "184765250",
        "TOTAL_DISPATCH_KERNEL_TIME": "15712",
        "TOTAL_COPY_OUT_SIZE_BYTES": "400715872",
        "TOTAL_COPY_IN_SIZE_BYTES": "500894840",
        "imageProcessor.blurGreen": {
            "BACKEND": "OPENCL",
            "METHOD": "MultiImageProcessor.compute",
            "DEVICE_ID": "1:0",
            "DEVICE": "NVIDIA GeForce RTX 3070",
            "TOTAL_COPY_IN_SIZE_BYTES": "24",
            "TASK_KERNEL_TIME": "37408704"
        },
        "imageProcessor.blurRed": {
            "BACKEND": "OPENCL",
            "METHOD": "MultiImageProcessor.compute",
            "DEVICE_ID": "1:0",
            "DEVICE": "NVIDIA GeForce RTX 3070",
            "TOTAL_COPY_IN_SIZE_BYTES": "24",
            "TASK_KERNEL_TIME": "43303936"
        },
        "imageProcessor.blurBlue": {
            "BACKEND": "OPENCL",
            "METHOD": "MultiImageProcessor.compute",
            "DEVICE_ID": "1:0",
            "DEVICE": "NVIDIA GeForce RTX 3070",
            "TOTAL_COPY_IN_SIZE_BYTES": "24",
            "TASK_KERNEL_TIME": "37633728"
        },
        "imageProcessor.blackAndWhite": {
            "BACKEND": "OPENCL",
            "METHOD": "MultiImageProcessor.blackAndWhiteTransform",
            "DEVICE_ID": "1:0",
            "DEVICE": "NVIDIA GeForce RTX 3070",
            "TOTAL_COPY_IN_SIZE_BYTES": "24",
            "TASK_KERNEL_TIME": "562400"
        }
    }
}
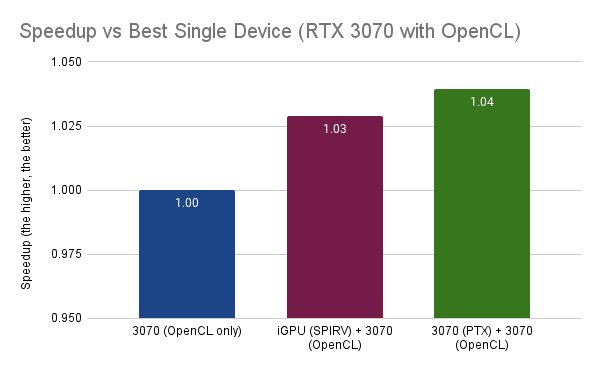
The potential problem for the black-and-white filter is that we need to copy the whole image to perform a very fast operation on the discrete GPU. But what if we execute the black-and-white transformation on another device (e.g., on the Intel HD Graphics using SPIR-V?)
To do so:
TornadoDevice device0 = TornadoExecutionPlan.getDevice(0, 0);  // spir-v
TornadoDevice device1 = TornadoExecutionPlan.getDevice(1, 0);  // opencl 0
TornadoDevice device2 = TornadoExecutionPlan.getDevice(1, 1);  // opencl 1
TornadoDevice device3 = TornadoExecutionPlan.getDevice(1, 2);  // opencl 2
TornadoDevice device4 = TornadoExecutionPlan.getDevice(2, 0);  // ptx
executionPlan.withConcurrentDevices() //
  .withDevice("imageProcessor.blackAndWhite", device0) //
  .withDevice("imageProcessor.blurRed", device1) //
  .withDevice("imageProcessor.blurGreen", device1) //
  .withDevice("imageProcessor.blurBlue", device1);
If we measure performance, we see that the new strategy runs, on average, 3.1% faster than running everything on a single device. Not bad. It is a minor improvement, but this shows the potential for many applications.
- The TornadoVM API is simple enough to do this type of exploration without sacrificing programmability.
- Depending on the workload, we can take advantage of the multi-device, multi-backend to improve the performance of our applications on heterogeneous hardware.
Finally, what if we run the black and white tasks with the PTX on the NVIDIA 3070 while the rest of the tasks run on the same device using the OpenCL backend? This final configuration runs ~4% (3.9% actually) faster than the original one (running everything with OpenCL on the same device).
Conclusions
This post has shown how TornadoVM developers can increase performance by running multiple tasks on multiple hardware accelerators concurrently, even with different backends. It has shown a performance analysis and a study of how performance could potentially be increased.
It shows that, ideally, to benefit in performance by running on multiple hardware accelerators, the accelerators should offer similar compute capabilities. However, if tasks are not homogeneous, we can take small advantage by placing heterogeneous tasks on different accelerators.
If you want to investigate further, I encourage you to run and test different configurations. What is your best configuration? Did you find a better combination? Share it!
https://github.com/jjfumero/jjfumero.github.io/discussions/12